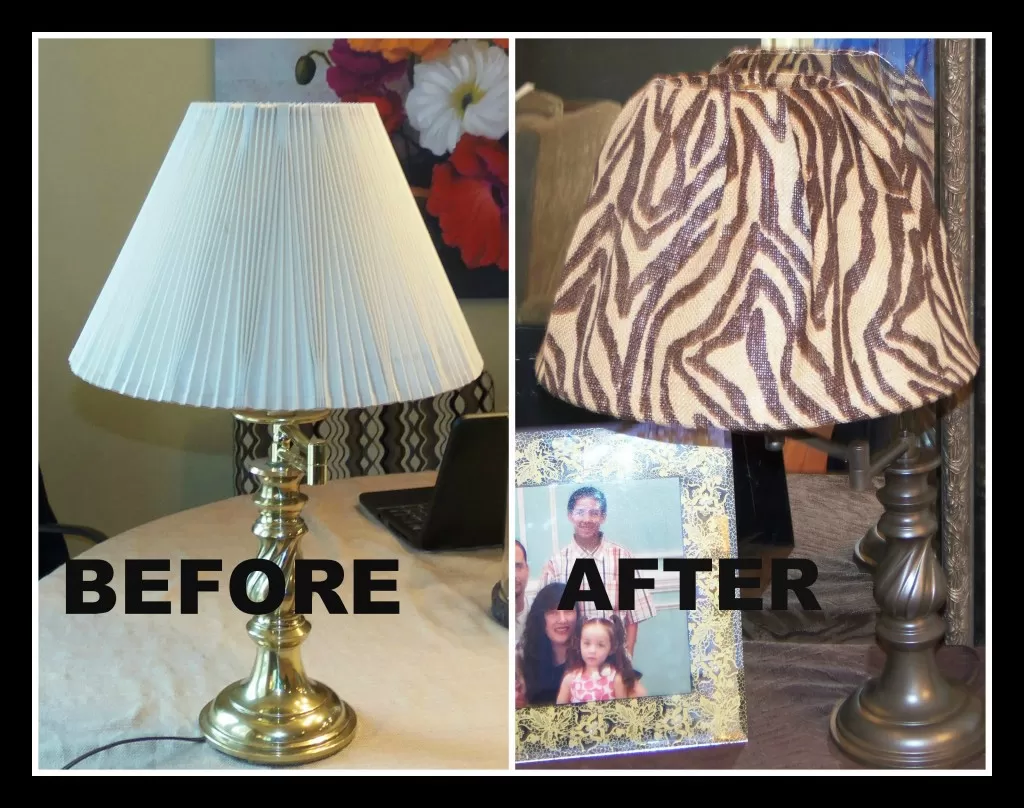
DIY – ReDo A Free Lamp Into Something New!
This post may contain affiliate links and I may be compensated for this post. Please read our disclosure policy here.
This older brass lamp was left at our house recently, and I was about to add it to our Good Will pile, when I thought twice about it and decided I could probably spruce it up for under $10. You could find these style lamps at your local Goodwill often (or garage sales), for fairly cheap. Even if you have to purchase an old lamp to spruce up, its still a great way to get a custom lamp for much less then purchasing a new lamp.
Since I was recently lamp shopping and realized that the price of lamps are high these days ($30 – $40 on the lower end for a table lamp in many areas, and upwards of $100 on the higher end), I thought $10 would be a great price since it was still in good working order. The good news – I was able to transform it from the before picture to the after photo for just under $8.
Here is how:
Step #1: Prep the lamp.
I started by peeling off the old accordion style fabric on the lamp shade. It was dirty and just plain unattractive. Be careful in this step, as you do not want to tear the lamp shade base underneath it.
Next I cleaned the base to prepare for step 2.
Step #2: Paint the base.
This is the step where you can save even more money if you wanted to go with a different look. You could paint the base a basic white or black for just $.99 (they sell $.99 cans at both Home Depot and Walmart).
I chose to go with a metalic finish. You can get silver, brushed nickle, etc. We chose bronze, as it goes with our home decor.
Tape off the top of the lamp base, and then spray the rest. This is the most dramatic difference instantly.
Step #3: Select your fabric.
I went with a zebra print burlap (just because I love both of those things!). You could go with an easier to work with fabric though.
I found my fabric at JoAnns. I purchased 3/4 a yard to have a little overage to play with. It depends on the size of your shade base as to how much fabric you will need. If in doubt take your lamp shade with you, or purchase a full yard and have some left over.
Burlap is tougher to work with, since its a more rigid fabric. You could use a lighter fabric if you want it to lay flat on the lamp shade. I just could not resist the zebra print burlap – so I was willing to go to some extra effort.
Depending on the shape of your lampshade, and how much you want to spend, there are a couple of ways you can do this (use spray adhesive and fabric glue, or a hot glue gun, etc). I suggest you google “How To Cover A Lampshade” if you want detailed ideas on other ways to cover it – or a You Tube Video with instructions.
I opted for the cheap and easy route, and simply pulled out and heated up my hot glue gun.
I then laid my fabric out on a table and measure it around your lamp shade on the bottom for width and top to bottom for length.
Next I cut the fabric, and tried to assemble the material around the lampshade until I found a look I liked. Then it was just a process of hot gluing the fabric to the bottom and the top of the shade, and trimming the excess.
If you want to dress it up even more you can purchase fringe or trim to also glue along the top and bottom of your lamp.
For me this was just a quick and frugal project, so I did not go to the extra expenses, but your imagination is your only limit (well maybe budget too), in decorating your own custom lampshade).
Cost:
- Lamp Free (but search around and you should be able to find a cheap lamp to start with if no one left one at your house)
- Paint $4.68 (I chose Rust-Oleum Metallic Finish in brown/bronze for this lamp). You could go as cheap as $.99 here if you choose black or white base.
- Fabric – I paid just under $3 at JoAnnes for my fabric (used a 50% off coupon from JoAnns Mobile App that a fellow customer graciously gave me!)
- Had the glue gun on hand, but you can sometimes find them at the dollar store (and a big bag of hot glue sticks too, if you do not have one).
Total Price: Just under $8!


